For the last few tubes I have used the three-part construction method, and I plan to use it for the forseeable future. For this reason, I have decided to document it in detail. The three parts are: the envelope (the outer shell of a vacuum tube), the stem (a length of thin tubing to connect the tube to the pump manifold, and the pinch (where the feedthroughs are sealed into the glass). Of these, only the envelope and the pinch require significant glasswork.
For the tube envelope, I begin with a 4-foot length of 18mm neon sign tubing. I then break it down into short lengths by mounting it in my lathe, scoring it with a roller-type glass cutter, and cracking the score line with a loop of Kanthal wire heated by my DC power supply. This method is very reliable and produces a clean, square edge. In this case I made six 5-inch pieces and three 6-inch pieces. Each piece will produce two envelopes, half the length of the original piece. Below are pictures of the scoring setup, and the completed pieces with the glass cutter.
At this point, the pieces are flame-polished on both ends and mounted in a collet on my milling machine, using teflon tape as a cushion. I then heat the tube in the middle (marked by a scratch on the glass) as it spins, which produces an hourglass shape. The hourglass is scored and snapped in half by hand, then the halves are mounted in the lathe and flame polished, producing tube envelopes. The results of each step can be seen below.
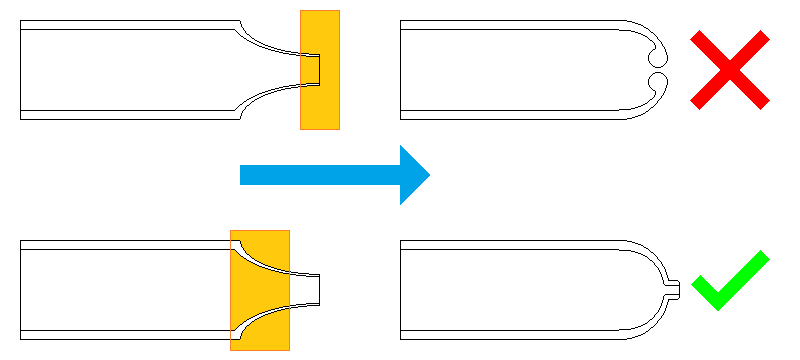
Flame polishing the envelopes is simple, but if done incorrectly it can result in an unusable envelope. If the thin edge is heated, it will gather together into a blob, which is difficult to work with and requires thorough annealing. If instead, the shoulder of the envelope is heated, the tip will gather together slowly, resulting in a round end with uniform thickness and a convenient nipple to attach a stem to. This is illustrated in the diagram below.
Making the pinch is a much quicker process. I begin with a 4-foot length of 10mm neon sign tubing, and break it in half using the same method as for the larger tubing. Once I have easy-to-use 2-foot lengths, I then mount the tubing back into the lathe. From here, I heat the end of the tubing while it spins, and flare it out with the shaft of a small screwdriver. I then score the tubing about an inch from the flare and break the end off using the same hot wire method described previously.
Once a pinch blank has been made, the feedthroughs can be sealed into it. This is accomplished by spot-welding various "hairpins" of titanium wire (typically 0.8mm) together, lightly oxidizing the wire (to the point where it turns blue; a flaky white oxide layer is too much), and sealing it into the blank using the lathe to keep everything centered. The actual pinching is accomplished with ordinary needle-nosed pliers. Due to the thickness of the pinch seal and the internal strain caused by the wire feedthroughs, the completed pinch seal must be allowed to cool slowly under a ceramic wool blanket, or otherwise annealed properly in an oven or kiln.

At this point, the parts are ready to be used to make a vacuum tube. In this case, a triode.