The diode described in the previous article failed the next day. This, among other things, convinced me to overhaul my approach to tube-making. I needed three things. First, I needed a bakeout oven, to thoroughly degas the tubes so that they wouldn't fail within a day due to outgassing of their components. Second, I needed an induction heater, to more effectively utilize titanium as a getter. Finally, I needed a new source of glass and a new construction method, as the two-part design with the 12mm tubing I was using effectively limited me to three electrodes per tube, due to the pinch seal area being extremely narrow. The oven and the induction heater are currently in development. The new method of tube construction is outlined here.
The new glass I ordered is clear uncoated neon sign tubing, from FMS. I initially ordered three sizes: 5mm (for evacuation stems), 10mm (for pinch seals), and 20mm (for tube envelopes). The 20mm tubing turned out to be lead glass, which was unpleasant to work with for a number of reasons and presented a health hazard in the form of dust from cutting the tubing. I contacted the company and ordered their 18mm tubing, which is lead-free, as a replacement. This glass is superb for tube-making. It is thicker than the previous tubing, softens at a lower temperature, and all sizes are compatible and can be fused together (theoretically even the lead glass, although I did not test this). The only downside is that due to the greater thickness and slightly higher coefficient of expansion, it is more prone to cracking as it cools. It easily forms a hermetic seal with titanium wire up to 1mm (and perhaps larger), and the seal is mechanically very tough and crack-resistant.
The construction method I used can be seen in the video on Claude Paillard's website. There are three key differences, however, which I consider to be simplifications, if not improvements. First is that for the tube envelope, while Mr. Paillard let the two halves of the tubing completely separate (7:35 in the video), I only heated the tubing until it formed an hourglass shape, which could then be scored with a file and broken in half easily. Second is that in making the pinch seal (5:30 in the video) I didn't use a special jig, I did everything on my lathe, pinching the glass with ordinary pliers. Finally, in assembling the tube (10:35 in the video) I didn't use a special jig either, I just did it by hand by first warming the two halves together in a cool flame, then tacking one corner with a hot flame and working my way around the edge. One last detail is that since I do not have an annealing oven, all parts were annealed by wrapping them in ceramic wool as soon as they were stiff enough to not be deformed by the pressure of the wool. This worked very well.
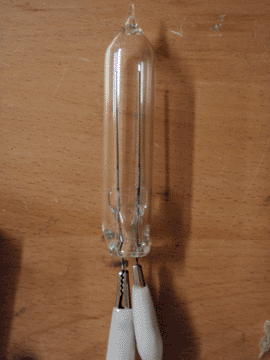
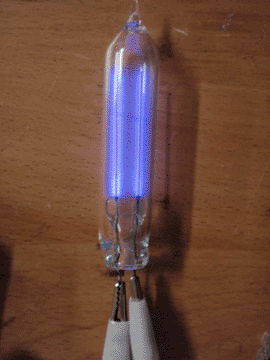
I initially set out to make another diode, but in learning how to use the new glass the failure rate was so high I eventually switched to making glow tubes, as less time would be invested per tube while I was practicing the glasswork. The results can be seen below. Electrically, it is similar to the first glow tube I made, although I let slightly more air in to produce a brighter glow that more closely surrounds the electrodes.
Now that I have the details worked out, this new construction method looks very promising. Using 0.8mm titanium wire (which I have found is the ideal size for tube leads) I believe I can fit up to 5 leads in one seal. For the moment, this is fine because there is no tube I am currently interested in making which would need more than that.