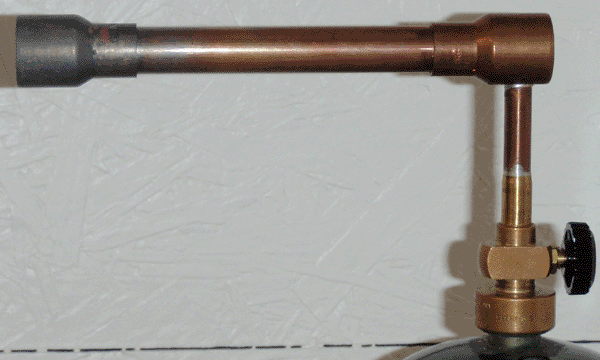

For earlier vacuum tube projects, the glasswork could be done using a standard blowtorch. However, the maximum diameter of glass tubing that can be worked with such a torch is around 3/4 inch. For larger projects, a larger torch was needed. I started with an existing blow torch head, and removed the end of it with a hacksaw. I cleaned up the cut end on my lathe, and machined an adapter pipe out of 3/8 inch copper rod. This adapter pipe was soldered into the old blow torch valve, and has an 0.8mm orifice at the tip. The orifice points down a 5 inch piece of copper tubing, with a reducer at each end to form a venturi. Only the near end reducer is soldered in place; the tubing and far end reducer are both friction-fit, allowing them to be removed or replaced.

The torch works well, and required no adjustment whatsoever. It can easily melt glass bottles. This was my first project involving propane, so I assumed it would be more difficult than it actually was. The only issues are that at low fuel pressure (adjusted by the original blow torch valve) the flame oscillates, and at very low pressure the torch backfires. The copper pipe does get hot (as indicated by the oxidation) but this is limited to the flame end; the near end and valve area only get hot after a few minutes of continuous use. This torch also uses much more propane than the previous torch it was built from, so I purchased an adapter to allow me to refill my 16oz propane bottles from a larger tank.
Hopefully this new torch will allow me to make larger, more powerful vacuum tubes, by using recycled glass for the envelopes. I have done some preliminary testing, and my neon sign tubing appears to be compatible with bottles and light bulbs. I will continue working in this direction, and will write an article on the new construction method once I manage to build a functional tube.