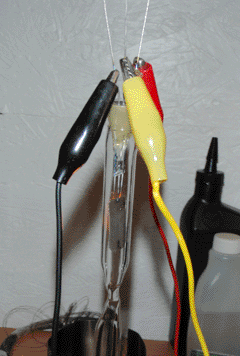
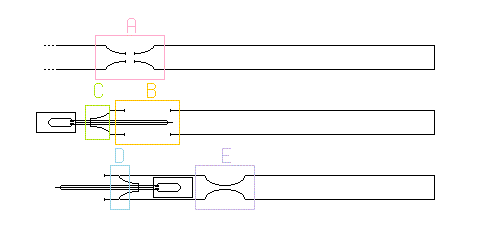
After many failures, I have finally made a working diode. It is constructed in a similar fashion to the previously described two-part light bulb, as can be seen in the diagram below. First, a 6 inch length of tubing was separated from some 12mm stock by heating, stretching, scoring, and breaking. (step A). However this time when stretching the tubing, I plugged any open ends with either a cork or my thumb. This causes the stretched section to condense on itself due to the vacuum, giving it a thicker wall. Next, I separated the conical end of the tubing by scoring and heating (step B), and heated and pinched the cone onto the hairpin assembly (step C). The hairpin assembly for this tube is made from 0.5mm titanium wire as usual, but with a third leg that has a piece of 0.2mm titanium sheet welded on as the anode. The filament is .001 inch tungsten wire, which appears to be the perfect size for tubes of this scale. Once the pinch seal had cooled, I soaked the electrode assembly in acetone for 10 minutes while stirring occasionally, then let it air-dry. This was to remove any fingerprint residue from the electrodes and the pinch seal. I then reversed the assembly and fused it to the main body of the tube (step D), and stretched another thin section (step E) where the tube would later be heated and sealed off. Again, when stretching this section, I plugged the open end with my thumb to condense the glass. I also reheated the sides of the stretched portion to collapse them inward and reduce the internal diameter, thereby reducing the chance of an implosion during the sealing off process.
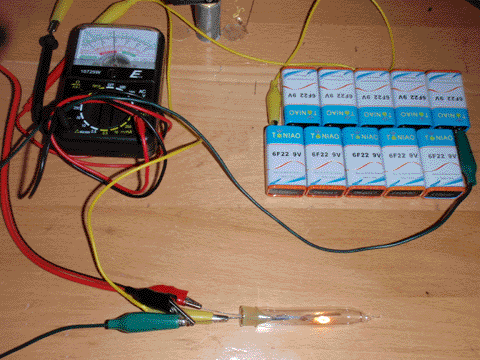
The tube was hot-glued to the pump manifold in the usual fashion and was held at a vacuum of 5 millitorr for 30 minutes. At the beginning of the pumping I thoroughly heated the tube with a heat gun to drive out any moisture on the inside of the glass. As the tube was under vacuum I did various tests on it, but the characteristics kept changing as the filament was consumed by stray air (5 millitorr is still a fair amount of gas). By the time I decided to seal off the tube, the filament current had dropped to less than half of its initial value, indicating that the filament had lost much of its mass. Due to the new method of condensing the thinned portion of the tubing, the seal-off went well.
After the tube was removed from the pump, I expected the filament to degrade rapidly and burn out. However, when the filament was run with 90 volts on the anode, the filament current and anode current both began to stabilize! I can only assume this means that the titanium anode was acting as a getter and captured any stray oxygen and nitrogen remaining in the tube. If this turns out to be repeatable, it will be a very useful feature.
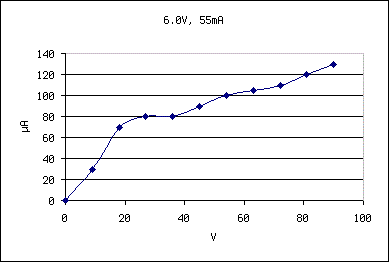
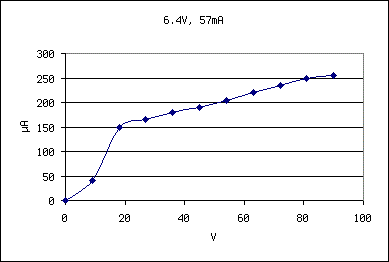
Once the filament current and anode current were stable, I measured the characteristics (anode current vs. anode voltage) of the diode at 6.0 and 6.4 volts on the filament, which can be seen in the graphs below. I attempted to do this at 6.7 volts as well, but due to the filament beginning to evaporate at this voltage I could only record data once, and I made an error in recording so this data will be omitted. Generally though, at 6.7 volts on the filament, the curve was the same as the two graphs shown but with the maximum value being around 500µA. To vary the anode voltage I used a stack of 10 cheap 9-volt batteries, with the connections between batteries acting as taps at 9-volt intervals from 0 to 90 volts. I also connected the batteries in reverse to apply -90 volts to the anode, and no current was observed.
Due to the overall low current, the lack of any current spikes, and the lack of a blue glow within the tube, I believe this diode is acting as a true vacuum diode, not a gas diode. I won't be certain until I make a triode, though. The distinction between a triode and a thyratron is much more clear.