
While hitches can be used to bundle multiple wires into a cable, this is in many ways an improvised solution, useful primarily due to the lack of tools required. For more robust cables, the gold standard is a braided covering, formed by weaving multiple strands of yarn in a circular over-under pattern around the wire core. In industry, this is most commonly achieved by the use of braiding machines, such as the maypole or wardwell braiders; however, these machines are not simple, so I decided to take a less automated approach. Kumihimo, a Japanese form of cord braiding, operates on a similar principle to the braiding machines previously mentioned, but is done entirely manually. Weighted bobbins are moved around a square or circular table in a certain pattern, and the strands of yarn from these bobbins form a braid which moves either upward (over a pulley) or downward (through a hole) at the center of the table. The braid thus formed is highly elastic, and if an object is fed into the center of the braiding area, the weave will expand to cover it. This versatility, as well as the simple nature of the equipment, made this method seem ideal for the small scale production of braided cables, so I decided to investigate it in detail.
I began by building the braiding table; it is made of yellow pine, stands 43" tall, and has a top surface 6-1/2" in diameter. All sharp corners on the top disk were rounded over with a router, and the entire table was sanded thoroughly to remove any rough spots. The table was then given three coats of varnish (sanding between coats), and was then polished with paste wax to minimize friction.
Next, the bobbins were made out of 1-1/4" hard maple dowel caps (although solid balls could have been used just as effectively), which were drilled out to accept a 3/4" by 1-1/4" steel rod as both a weight and a joining dowel. Their shape was chosen for impact resistance, as the bobbins knock against each other constantly during braiding. For the finish, I simply polished them with paste wax on my lathe, as varnish would be difficult to apply to a spherical surface, and would likely wear poorly due to the constant impact and abrasion. They weigh three ounces each, and I made one extra to hang from the braid itself and provide tension. The table and bobbins can be seen below.

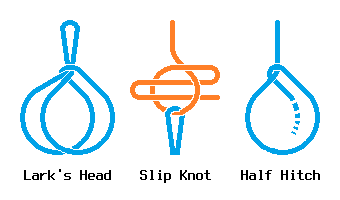
At this point, the table is ready to be used; however, the bobbins must be prepared in a certain way to avoid wasting yarn, and to avoid having the bobbins accidentally unwind during braiding. This relies on three specific knots, which can be seen below. The lark's head knot is used to attach a leader to the bobbin; this is reusable, and allows the full length of the braiding yarn to be woven into the braid. The braiding yarn is then attached to the leader with a slip knot, to allow easy removal. This slip knot can also be used on the central tensioning weight, or anywhere else that requires an easily-untied knot. Finally, once the yarn is wound onto the bobbin, a half hitch is used to suspend the bobbin without it unrolling. This hitch is easily made and remade during braiding by holding the bobbin in one hand, then passing it through the back of a loop made with the other. With these knots complete, the desired number of bobbins can be wound with one or more strands of yarn, and those strands can be tied together and tensioned in the center of the table so that braiding can begin.
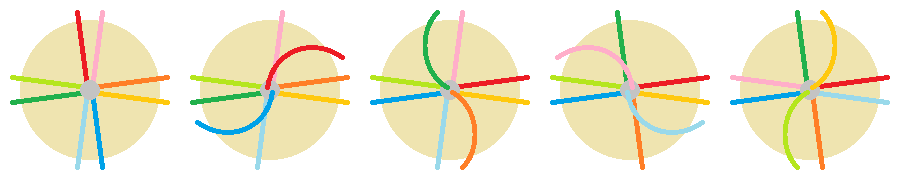
There are a wide variety of braiding patterns which can be used with this equipment, but the most useful for the purpose of making cables is the hollow braid, which consists of a simple over-under pattern. However, since bobbins cannot be easily moved under each other, and since the user can only move two bobbins at a time, the pattern of movement is slightly more complicated. Fundamentally, the pattern consists of moving half of the bobbins clockwise over their neighbor, then the other half counterclockwise. This is then split between the two hands, which each handle one half of the table, and always move opposite of each other to keep the bobbins balanced. This pattern can be used with any bobbin count that is a multiple of four, but I found that eight bobbins provides the best balance of coverage and speed. This specific braiding pattern was used to create the cable at the top of the page (using three strands of #10 crochet yarn per bobbin), and is demonstrated in detail in the diagram below. However, due to the information-dense nature of this type of diagram, this is likely only to be useful as a direct reference while braiding.
If the yarn is uniform and smooth, the bobbins evenly weighted, and the braiding performed methodically with little variation in movement, the braids produced by this method are excellent. The covering pulls itself tightly to the underlying wire, and is flexible enough to stretch (rather than slip) when the wire is bent. Unlike yarn windings, the woven sheath adds little to no stiffness to the wire, and thanks to the polished surfaces of the table the yarn does not become fuzzy or uneven, with the finished braid presenting a hard and slick surface suitable for handling. When a section is cut, there is limited fraying rather than total unraveling, and every strand of yarn at a given point must be severed for the covering to slip out of place. The braid can be easily terminated with a short wrapping of yarn or a constrictor knot, and overall the finished product is no more difficult to use than plastic-insulated cable. Having spent a considerable amount of time working up to this point, I can say I am entirely satisfied with the results.